We went to the Zoo today, and I brought along the Canon EF 75-300mm f/4-5.6 USM MK II lens. I wanted to try getting up close and personal with some of the animals, which is something I hadn’t really tried before. I’ve usually gone with the point-and-shoot, or just the kit 18-55mm lens on the XT. This was the first time I tried shooting animals at 300mm. I wound up taking 178 photographs. I kept 18, and I’m really quite happy with the shots that survived the cut.

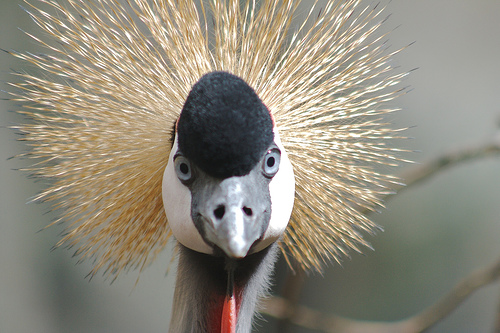
The technique I was trying was to get as close as possible, then get even closer. Many of the shots I like the most from this visit are shots that would have been uncomfortably “close” if I wasn’t forcing myself to get closer. The second shot of the East African Crowned Crane, for example, might normally have been shot such that the entire crown was included. But by getting even closer, I think the shot is much more interesting.
I was shooting without a tripod or monopod, so wanted to force a fast shutter. I bumped the ISO to 800 (on a bright sunny day) and shot in Aperture Variance mode with the aperture cranked wide open. The theory being, if I force as much light as possible onto the sensor, I’ll compensate for hand-holding.
Except that I accidentally screwed up royally. Somehow, I’d inadvertently twiddled the buttons and knobs and wound up setting the exposure compensation to be 3 stops higher than normal. Meaning every single shot was terribly overexposed. Unbelievable, painfully overexposed.
Thank the gods I shoot in RAW, and use Aperture. Aperture freaking rocks. On most shots, all I had to do to rescue it was to drag the “Exposure” slider to the left. That’s it. On others, I had to futz with Highlights and Shadows, and Levels on a couple others. A few shots that had lots of light or white wound up with so much lost data that they were lost. But the vast majority were saved, and were actually acceptable.
Lesson learned – check all camera settings before starting a shoot or project. ISO. Exposure compensation. Maybe even image size and format (make sure it’s in RAW). Aperture may be an amazing tool, but it’s just plain silly and reckless to fall back on editing and manipulation to rescue images, if that could have been easily prevented by just properly setting the camera. But, it’s good to know that if Something Bad Happens, I can pull some useful images out of an otherwise garbage roll.
You inspire me. Someday I’ll learn half of what you know.
@Dean: I don’t actually “know” that much – I just keep fiddling and practicing. Obviously, I’m still making huge mistakes (exposure compensation. doh) but it’s still fun messing around.
sweet shots!
sweet shots!
@davidicus: thanks! I was really surprised/impressed at how well some of the shots turned out – especially after rescuing them from overexposure.
Couldn’t agree more and this article is very timely. I was just at the Woodland Park Zoo yesterday, now wishing I had a 300mm lens, and RAW rules. I took many indoor shots of animals at as fast of a shutter speed as I could knowing that when I got home, I could get the extra exposure via Camera Raw.
Nothing infuriates me more than people trying to take pictures of animals through glass with flash. A) They’re not going to get a good image most likely and B) it simply disturbs the animal. Isn’t it enough that we’re gawking at them?
Beautiful animal shots! Thanks for sharing.
Loved the face on view of the crane – great expression and the tigher crop worked. Enjoyed the prosimian shots as well. I liked underlying stillness and the threat of menance for the tiger, unfortunately the shiny log in the background distracts from the image. It looks like the hilights are blown so you might not be able to do any creative dodging – (can you get them back with some other RAW settings ?). Looks like I might be needing to upgrade the quality of my 70-300 mm.
Thanks, Niran. Highlights are definitely blown because I accidentally shot with exposure comp. set waaaay too high. Once the data’s gone, it’s gone. RAW ain’t magic, although it sure helped rescue much of the image. This is pretty obvious in the White Handed Gibbon shot – the hair on its head is way blown out. Also, the highlights on the shoulder of the gorilla. Yikes. I minimized that by cranking up the Highlights adjustment, but that also shows some posterization. I learned my lesson, and will double/triple check to make sure exposure comp. isn’t accidentally adjusted.
Great post. I really enjoyed it. I will have to bookmark this site for later.